
Measuring the fence length on a site plan is the starting point for a material take-off. Before placing an order, however, you also need to establish how many panels and line posts are required, how corner and end posts are distinguished, whether gate posts are counted separately, and where non-standard panels are needed. Simply dividing the total length by the panel width often hides these differences.
A reliable take-off needs a clearly identified drawing revision and agreed connection details. Divide the fence into runs, count each bay against the confirmed layout, and then total the accessories and special components. Procurement, production and site installation can then work from the same quantities.
Confirm the drawing revision, units and scope
Before measuring, check the drawing number, revision, dimensional units and take-off limits. CAD layers may contain existing fencing, proposed fencing, sections to be removed and alternative layouts at the same time. Not every line that resembles a boundary belongs in the procurement quantity.
Check stated dimensions first where they are available. When measuring from a PDF or screenshot, verify the scale against known dimensions rather than relying on the on-screen display scale. Mark conflicting information in the take-off schedule instead of concealing design discrepancies with estimates.
Divide the boundary at ends, corners, gates and level changes
Give each run an identifier on the plan and record its start and end points, length, fence type and height. Gate openings, corners, movement joints or structural interfaces, abrupt slope changes and special terminations should be treated as checking points. A change to one run can then be understood without reinterpreting the entire boundary.
Before deducting a gate opening, establish whether its drawing dimension represents the clear opening, the gate-post centre distance or another control dimension. Gate posts, adjacent panels and their connections occupy space, so these definitions are not interchangeable. On sloping ground, distinguish the horizontal plan length from the measured length along the slope. The length used for counting must use the same measurement basis as the post spacing. Check elevations as well to confirm panel heights, step differences and post lengths.
Panel width and post centre spacing are different dimensions
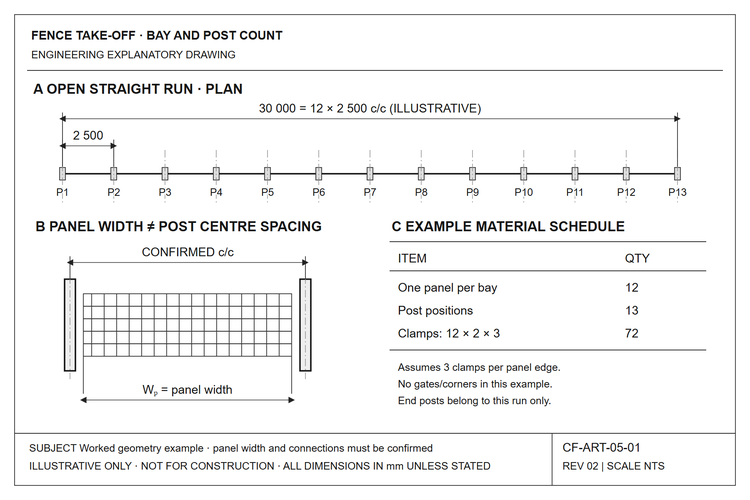
The take-off must use the confirmed layout module for the selected system. Panels may fit between posts or overlap the side of a post, and connections and installation clearances affect the centre spacing. A panel width stated in a product schedule should not automatically become the site setting-out dimension. For example, when selecting 2DG double-wire mesh fencing, coordinate the panel, matching post and connection detail before fixing the take-off module.
For example, assume a run has a post-centre control length of 30.0 m, a confirmed standard centre spacing of 2.50 m, and end conditions already accounted for. It can accommodate 12 bays. That uninterrupted open straight run has 13 post positions. The 2.50 m spacing is a teaching example, not a default spacing for any CommandFence model.
Check the counting logic with a simple example
If each of those 12 bays contains one panel, the requirement is 12 standard panels and 13 post positions. If the proposed connection detail explicitly requires three clamp assemblies on each panel edge, with the two edges fixed separately, the clamp quantity is 12 × 2 × 3 = 72 assemblies. This quantity depends on those assumptions and does not apply to systems without separate clamps or with shared clamping bars. For a system such as 3DT welded mesh fencing with an integrated post connection, confirm the actual supplied components instead of applying the independent-clamp example.
Recheck shared nodes wherever the fence turns, forms a closed boundary or connects to a gate post. Post counting for a closed boundary differs from an open straight run, and a corner post must not be ordered twice when adjacent runs are totalled. The example demonstrates the counting method; final quantities should follow a bay-by-bay layout.
Do not simply round up an incomplete bay
Where a run length is not divisible by the standard bay spacing, establish whether the end bay needs a custom panel, an approved cut-panel termination or a revised layout. Rounding the panel count upwards provides only a rough length or coverage allowance. It does not demonstrate that the installation arrangement will work.
List special panels separately, including their dimensions, orientation and installation position. Confirm cut-edge protection, fixing points and coating repairs as well. Without an agreed detail, do not assume that every offcut can be reused on the next run.
Include accessories, gates and supply boundaries in the schedule
Distinguish panels, line posts, end posts, corner posts, gate posts and posts of different lengths in the material schedule. Then list clamps, clamping bars, fasteners, post caps and other confirmed accessories. State individually whether foundations, anchors and gate hardware are included.
For each entry, retain the run identifier, specification, unit, net quantity and notes. Discuss installation losses and operational spares separately rather than increasing every component by a single percentage. Run identifiers also help the site team check deliveries when containers or shipments are split.
What information should you send to CommandFence?
Send CommandFence the latest plan, key elevations, connection details and gate schedule, together with the required height, surface treatment, supply scope and phased-delivery requirements. This reduces repeated questions caused by a total length alone. Photographs of difficult terrain and corners can help identify interfaces that need further confirmation.
CommandFence can coordinate panels, posts, gates and connection accessories around project drawings and specifications. Aligning key details and quantities before production makes quotations easier to compare and packing lists easier to match to the site installation sequence.
Explore CommandFence fencing products and configuration options





Leave a Reply